
Scenario
One of your biggest clients calls you and asks: Why is my AWS bill so high?
Hi, my name is Jorge Rodriguez, as a Lead Cloud Engineer and an AWS Ambassador – I’m here to empower you with the tools, the knowledge, and the expertise you need to answer this, and:
- Describe the value proposition of AWS
- Learn to use tools to determine critical areas of spend
- Assemble plans to optimize your AWS workload for cost
- Align all of this with the AWS Well Architected Framework
Ready to dive in? Let’s go!
AWS Cost Explorer
Our first stop in getting some quick financial answers is AWS Cost Explorer. The Cost Explorer has come a very long way from it’s inception in April of 2014 – it is now feature rich with functionality rivaling that of purpose-built third party solutions.
I recommend for scenarios with multiple accounts that consolidated billing is turned on. This makes it easier to track and manage spend across an organization. Additionally, when you get into things such as Savings Plans and tagging, it is more efficient to manage this from a central account. Everything from Service Control Policies for IAM, Single-Sign on, and Resource Management will work better with AWS Organizations and Consolidated Billing turned on. From your master payer account, you can use Cost Explorer and have access to the billing visualizations for every account in the Org, from one to a thousand – it’s very powerful.
By default only the root user has access to billing information. As a best practice you should enable IAM access to billing tools so you can access this information with a less privileged user. Note that you only need to enable this IAM access once. The following AWS Tutorial will guide you through the process of setting up financial users and managers via IAM policies.
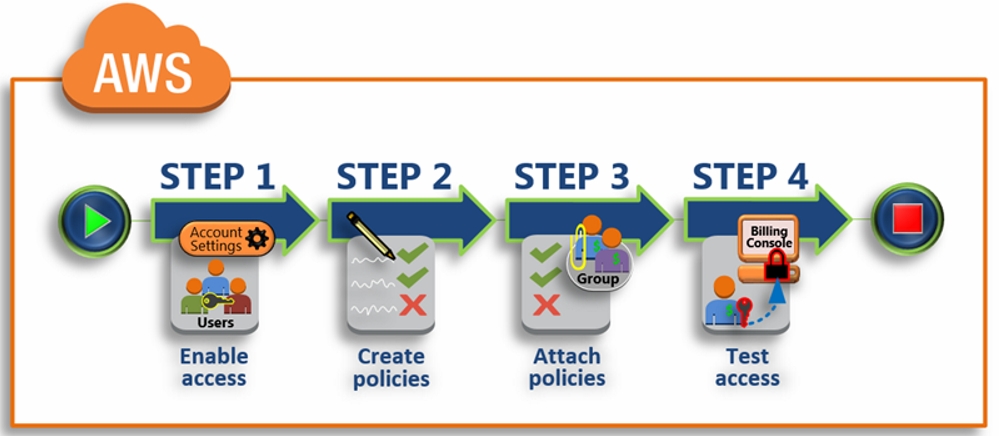
Source: AWS IAM User Guide
Sneaky Spenders
Additionally, you want to watch out for some of the high spenders and sneaky spenders. These are the ones that can generate a high amount of spend without you being aware. For example, you can have a small instance, but with provisioned IOPS storage, which can generate some hefty bills. These will accrue cost even when the instance is stopped. The same goes for unattached EBS volumes. This can easily happen when testing, prototyping, and rebuilding servers. This is something where I advise to review unattached volumes, remove them if not needed. If you’re not sure, snapshot them and remove. If it’s PIOPS volume, you won’t incur such a high cost for snapshot – just for the underlying S3 storage. Remember to check your load balancers as well, make sure you are utilizing all that you have running. Make sure you also understand Elastic IP Address charges – make sure you don’t have a number of unused ones sitting in your account, or you will be charged.
Are you Well Architected?
Cost Optimization is one of the five pillars of the AWS Well Architected Framework. The full framework is outside the scope of this blog post (but may be covered later!) . This is comprised of decades of on-the-field knowledge gained through developing customer solutions on AWS. The Cost Optimization pillar can be broken down into the following values:
Implement Cloud Financial Management: This is an investment that must be made, keep cost efficiency front and mind and be ready to champion it in your engagements.
Adopt a consumption model: A key strategy to drive here is to control development and testing environments so that they do not run 24/7. These environments are typically only utilized during business hours during the work week. Turning off these resources or removing and rebuilding them via CloudFormation can yield a potential cost savings of 75% – 40 hours vs. 168 hours. I highly recommend you look into scheduling and infrastructure as code.
Measure Overall Efficiency: Design, build, and measure. Make data-driven decisions. Better to start with a smaller instance in development, and increase until all performance requirements are met. Once an application is in production, continue to measure and optimize based on changing workload patterns and also on new AWS offerings such as Graviton.
Stop spending money on undifferentiated heavy lifting: One of the tenets of AWS is that you pay only for the computing resources you consume, as opposed to being locked into a costly data center lease, having to account for HVAC, racking and stacking, and other overhead costs. Instead, you can focus on the unique value you bring to the marketplace .
AWS Cost Explorer Demo

1. First, be aware that all of the filters and customizations you make here can be saved. This lets you continue working where you left off, and have a readily accessible group of reports you can use to get a quick idea of your Cloud Spend.
2. By default – Cost Explorer filters for the last 6 months. This can be made more or less granular, with whichever date ranges you prefer. The coverage is up to 18 months of billing data. For anything older than this you will have to access the actual AWS bills in the billing console.
3. The ‘group by’ allows for many dimensions of breaking down your AWS Cost.
For grouping you can break things out by Linked Account and quickly see how much each is spending (For AWS Organizations).
Region is another useful one – both for multi region and also to see if there are groups that may be spinning up devtest machines in regions you may not know about – a small but crucial part in a governance strategy. You can also look at Service Control Policies to rein this in and prevent it in the first place.
You also have instance types, to give more insight into what specific type of EC2 instances are being used and what they cost. You can also break down cost by a single tag – such as application, project, environment – any user defined tag. Remember that tags are case sensitive. Normalizing them is another big part of governance, which we’ll look at later in the tag editor.
4. For Filters I want to draw your attention to: Usage type. This is an interesting one to see many different kinds of costs – such storage costs. Here you can use wildcard filters to search for things such as ‘all EBS costs’ , or ‘all data transfer costs’.
EC2 Rightsizing Recommendations
Another useful feature of Cost Explorer is EC2 Rightsizing Recommendations. After enabling, it may take up to 30 hours for the initial evaluations. After this period, you’ll be able to see opportunities for EC2 instances which can be resized or terminated. A large number of Key Performance Indicators are used to determine if an instance is idle or underutilized. Additional information is available in the AWS Documentation.
AWS Savings Plans
Released in 2019 – this is a new, more flexible option to save on AWS costs for a 1 or 3 year commitment to spend. Unlike the Reserved Instances, here you are committing to spend a certain amount, instead of locking in to a certain instance type of family. It is most similar to convertible Reserved Instances. Additionally, it has support for Fargate and Lambda – so if your workload is using these you certainty want to consider Savings Plans. Oh, and it has SageMaker support too, for those Machine Learning workloads. In essence, Savings plans offer significant savings – they’re the new more flexible version of RIs.
Here you can see the AWS Savings Plans Recommendation parameters:
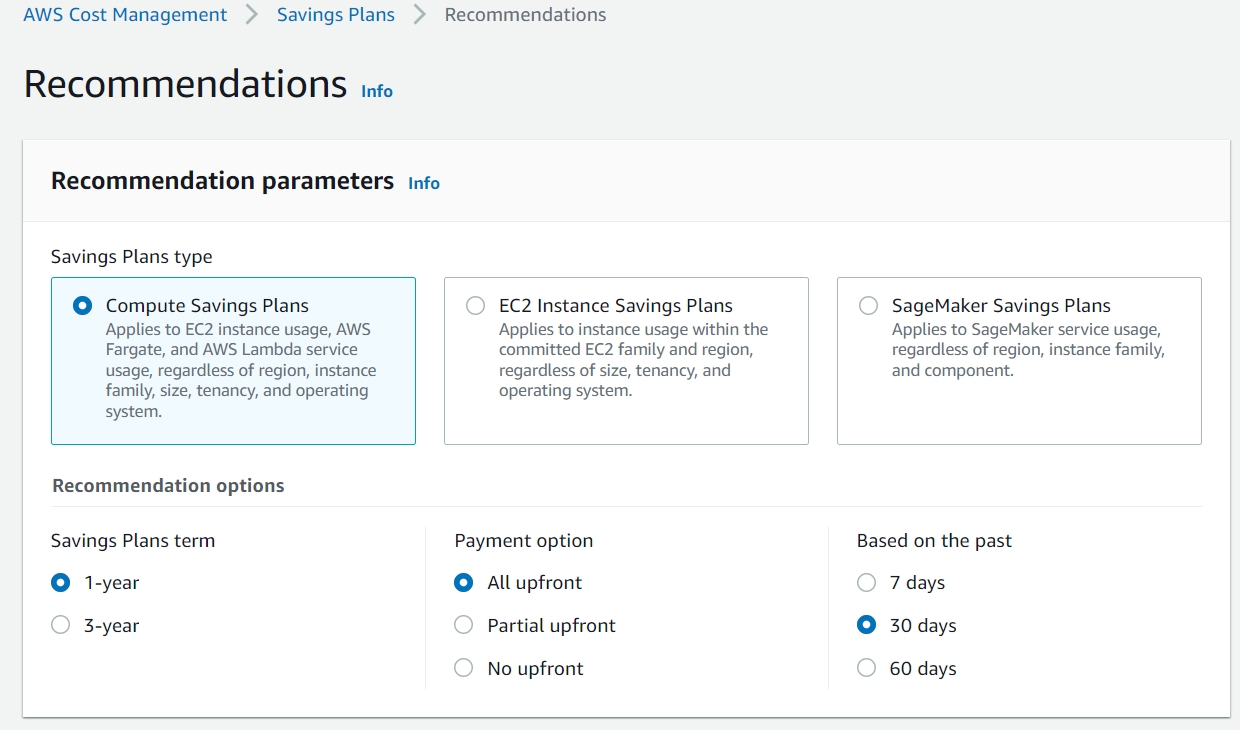
This can be done on an account level or from the master payer. You do not need AWS Organizations for this.
AWS will make these recommendations based on your past 7, 30, or 60 days of usage. The more stable your workload, the fewer days you can use. If you know that the customer will be decommissioning a very large number of instances, you may want to wait until after to run a new calculation. You also have the option of entering the usage values yourself. Bigger terms will also mean bigger savings, though I typically recommend 1-year commitments for more flexibility amid growing environments. Once you commit to a Savings Plan and your usage automatically begins , you can use Cost Explorer to check your utilization. Navigate to Savings Plans -> Utilization for customizable reports you can use to understand your usage. Additional savings plans can be purchased. All of them are evaluated when calculating your monthly bill.
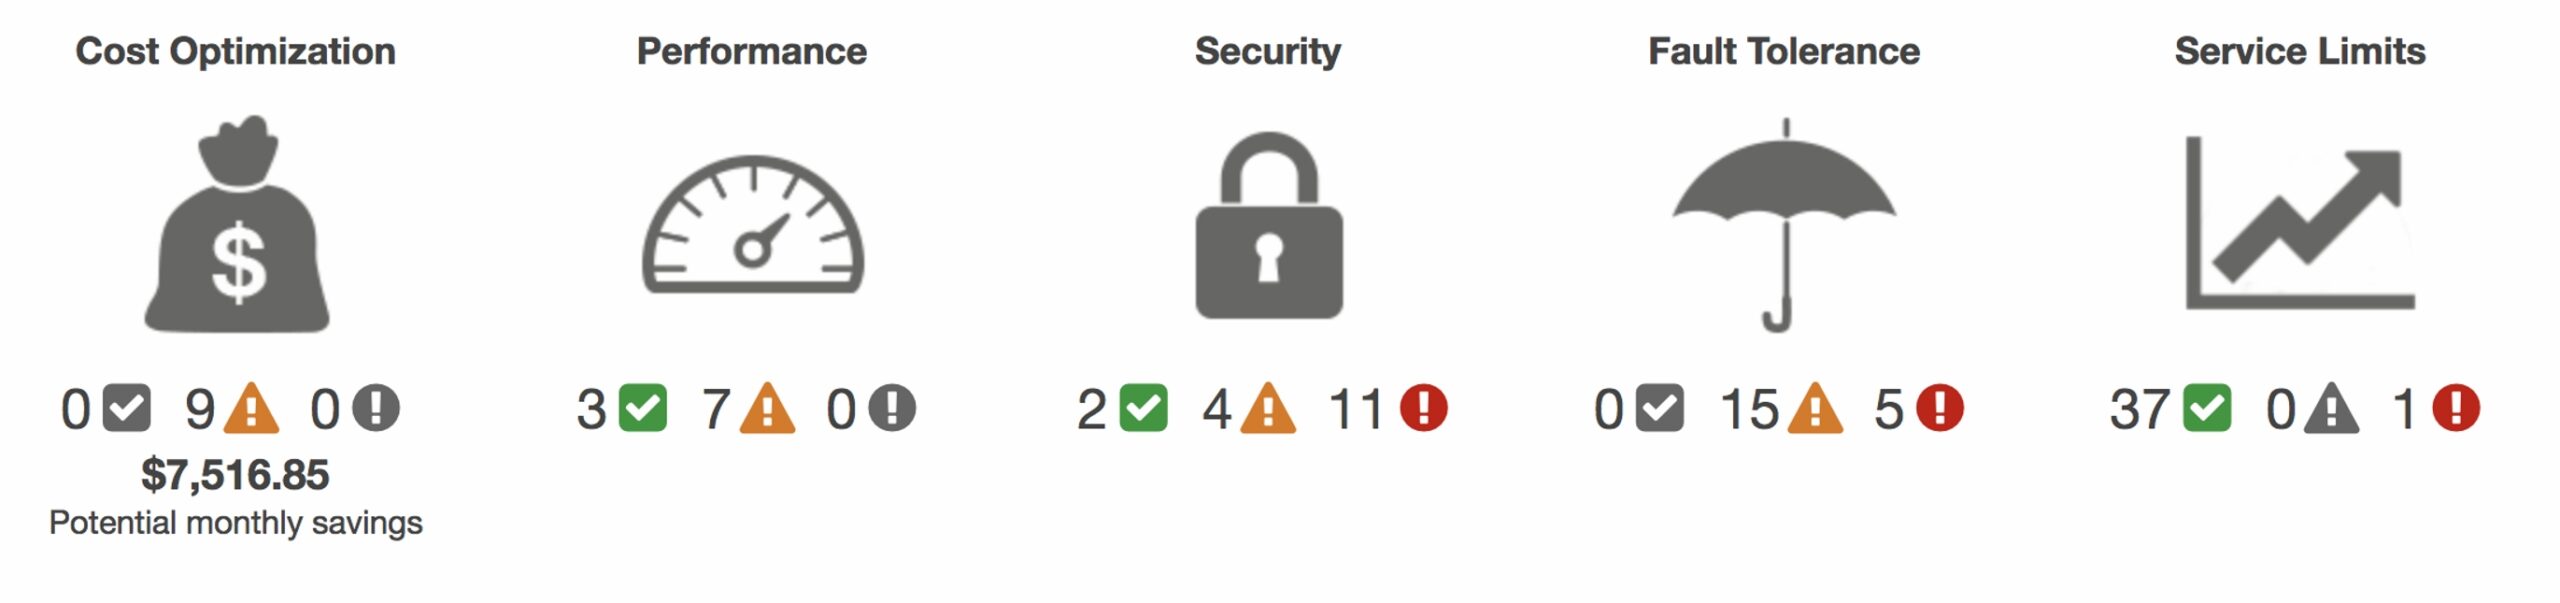
AWS Trusted Advisor
Trusted Advisor provides you with a suite of tests for your AWS account – covering Cost optimization, performance, security, fault tolerance, and service limits. In order to have access to all the checks, you must have an AWS Business or Enterprise Support plan. Many of the checks discussed earlier in this blog post – such as unattached EBS volumes, Elastic IP address usage, and idle instances are checked by Trusted Advisor.
GP2 to GP3 conversion
Another source of savings is to look at your EBS Volume types. GP2 volumes can be converted to GP3, with no downtime, and resulting in 20% savings in storage costs, as well as more flexibility in the IOPS performance characteristics for each individual volume. Instructions to do so are provided here by AWS.
With this, it’s important to stay up to date on new AWS services to take advantage of savings opportunities as they emerge.
Amazon Workspaces Cost Optimizer
It can be difficult to decide what is the ideal billing pattern for Workspaces – Monthly or Hourly. In my experience, the break-even point is typically around the 80 hour mark. AWS has created a solution that you can deploy in your environment to automatically convert your workspaces to the most cost effective option. It’s a secure one click deployment and it accomplishes this by monitoring your current usage. Guide and deployable template are available here.
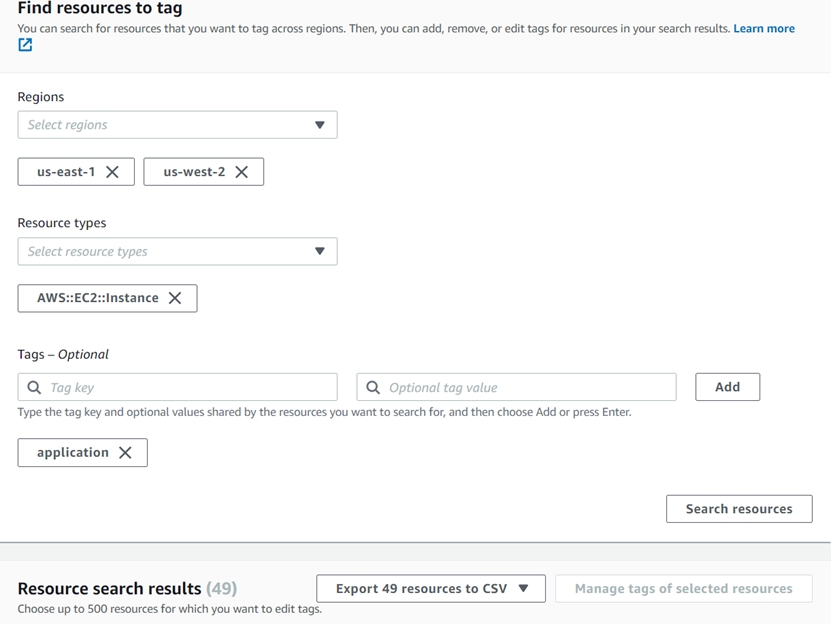
Tag Editor
You get to this tool via the AWS Resource Editor. This lets you get a quick view of all your account resources. You can break it down by tag and also by specifically untagged resources. It also allows for service filtering, for honing in on RDS, EC2, VPC, providing very granular filtering. You can search for thousands of results and update them all very quickly, so if people are using five different variants of application or environment, you can use this tool and sort it all out in a few minutes.
You can update many at a time, up to 500 at once. Do note that tags are not retroactive for billing purposes. It helps to design and enforce your tagging strategy early-on.
Well Architected Labs – Cost Optimization
There are a number of labs here – 100,200, and 300 level. It covers beginner to advanced. I highly recommend you get hands-on experience using some or all of the tools we’ve discussed here. Many of the labs are short and can be completed in 15 minutes, but giving you valuable experience.
Conclusion
Using all of these tools can help you be knowledgeable and drive results for Cost Optimized workloads. I highly encourage you to invest time in learning this. If you have any questions, please feel free to contact us.

Jorge Rodriguez
Senior Lead Cloud Engineer
[email protected]