
Easily apply configurations with custom bundles created from your existing WorkSpaces for consistent rollout across operating systems
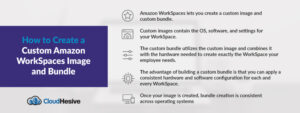
Once you’ve launched set up and launched your Amazon WorkSpaces, you chose a Workspaces bundle of your operating system (Windows or Amazon Linux) and customized it. You can now create a custom image and custom bundles from that WorkSpace and use it as the basis of future deployments.
Your custom image contains the OS, software, and settings for your WorkSpace. When you create a custom bundle, it contains the custom image combined with the hardware needed to launch a WorkSpace as well as your selected compute and storage configuration. Building a custom bundle allows you to apply a consistent hardware and software configuration to all of your Workspaces.
The same custom image can be used to create different custom bundles through the selection of different compute and storage options. If you need to update or install additional software on your WorkSpaces, your custom bundle can be updated and used to rebuild all of your WorkSpaces.
Here’s how to create your own custom Amazon WorkSpaces image and bundle. (Note that Windows and Linux have different requirements.)
Requirements for creating WorkSpaces custom images
For both Windows and Linux, the WorkSpace status must be Available and the modification status must be None. Additional requirements include:
For Windows
- Every application and user profile on WorkSpaces images must be compatible with Microsoft Sysprep.
- Every application you want to include in the image must be installed on the C drive.
- The user profile must already exist and must be located at D:\Users\username. Its total size (files and data) must be less than 10 GB.
- The C drive must have a minimum of 12 GB of available space.
- Application services running on the WorkSpace must use a local system account rather than domain user credentials.
- Make sure the WorkSpace is not encrypted – image creation from an encrypted WorkSpace is not supported.
- This list of components is required in an image. Without these, the WorkSpaces that you launch from the image will not function properly:
-
- Windows PowerShell version 3.0 or later
- Remote Desktop Services
- AWS PV drivers
- Windows Remote Management (WinRM)
- Teradici PCoIP agents and drivers
- STXHD agents and drivers
- AWS and WorkSpaces certificates
- Skylight agent
For Linux
- Every application to be included in the image has to be installed outside of the user volume (the /home directory).
- Make sure the root volume (/) is less than 97% full.
- Make sure the WorkSpace is not encrypted – image creation from an encrypted WorkSpace is not supported.
- This list of components is required in an image. Without these, the WorkSpaces that you launch from the image will not function properly:
- Cloud-init
- Teradici PCoIP agents and drivers
- Skylight agent
Once these operating-system-specific requirements are met, you can create your image and bundle
Creating your custom image and custom bundle
It’s optional, but you can specify a custom computer name format for your image for WorkSpaces launched from your custom or bring-your-own-license images. Specify a custom prefix for the computer format instead of using the default format and follow the proper process for your image type.
If you have Windows WorkSpaces, it’s recommended that you use the Image Checker, which runs a series of tests on the WorkSpace you want to use for image creation and gives recommendations to resolve any issues it finds. It’s important to note that the WorkSpace has to pass all the Image Checker tests before you can use it for image creation. Guidance for creating a custom image for either Windows or Linux, as well as best practices, can be found in this guide.
Once you’ve validated your WorkSpace image, you can proceed with creating your custom image and custom bundle.
If you are still connected to the WorkSpace, disconnect by choosing Amazon Workspaces and Disconnect in the WorkSpaces client application. Then:
1. Open the WorkSpaces console at https://console.aws.amazon.com/workspaces/
2. Choose WorkSpaces in the navigation panel.
3. Select the WorkSpace and choose Actions, Create Image. If the status of the WorkSpace is STOPPED, start it first (choose Actions, Start WorkSpaces) and then choose Actions, Create Image.
4. You’ll see a message prompting you to restart your WorkSpace. This updates your Amazon WorkSpaces software to the latest version. Close the message and reboot your WorkSpace. When you’re done, repeat Step 3, but this time select Next when you see the reboot message. As we mentioned earlier, to create an image, the status of the WorkSpace must be AVAILABLE and the modification state must be None.
5. Next, enter an image name and a description that will help you identify the image, then choose Create Image. While the image is being created, you’ll see that the status of the WorkSpace is SUSPENDED, which means the WorkSpace is unavailable.
6. Now choose Images in the navigation panel. When the status of the WorkSpace changes to AVAILABLE, that means the image is complete. This can take up to 45 minutes.
7. Choose the image and select Actions, Create bundle. (NOTE: To create a bundle programmatically, use the CreateWorkspaceBundle API action. See CreateWorkspaceBundle in the Amazon WorkSpaces API Reference.)
8. After entering a bundle name and description, do the following:
- For Bundle hardware type, specify the hardware to use when launching WorkSpaces from this custom bundle.
- For Storage settings, select one of the default combinations for the root volume and user volume size, or select Custom and enter the values (up to 2000 GB) for Root volume size and User volume size.
- The default available size combinations for the root volume (for Microsoft Windows, the C drive, for Linux, /) and the user volume (for Windows, the D drive; for Linux, /home) are:
-
- Root: 80 GB, User: 10 GB, 50 GB, or 100 GB
- Root: 175 GB, User: 100 GB
- For Graphics and GraphicsPro WorkSpaces only: Root: 100 GB, User: 100 GB
Or you can expand the root and user volumes up to 2000 GB each. Ensure that your data is preserved. You cannot decrease the size of the root or user volumes after you launch a WorkSpace, so make sure you specify the minimum sizes for these volumes when launching a WorkSpace.
9. Select Create Bundle.
10. Confirm your bundle has been created by choosing Bundles and checking that the bundle is listed.
Now you know the ins and outs of creating custom bundles to make it easy to maintain consistency among your Amazon WorkSpaces, whether across town or across the globe.
CloudHesive helps you make the most of Amazon WorkSpaces
We’re a cloud solutions consulting and managed services provider with expertise in all things Amazon Web Services. We have eight AWS Competencies, more than 50 AWS Certifications, membership in nine Partner Programs, and the experience and knowledge to help your business realize all the benefits of AWS cloud.
We’ve helped more than 100 companies reduce their operating costs and increase productivity with our focus on security, reliability, availability, and scalability. With over 30 years of experience, we leverage cloud-based technology to its full potential. Contact the CloudHesive team today.


